
Welcome to my portfolio! It's a showcase of my passion for computer graphics, rendering, and interactive technologies. From GPU architecture to procedural graphics, I blend technical expertise with a creative mindset to bring ideas to life.
Explore my work in physically-based rendering (PBR), Monte Carlo path tracing, GPU computing (CUDA, Vulkan, WebGPU), interactive graphics, and advanced shader techniques. Each project reflects my dedication to building visually compelling, high-performance solutions that elevate the user experience. Use the navigation bar to peruse my projects about transforming complex concepts into innovative visual creations.
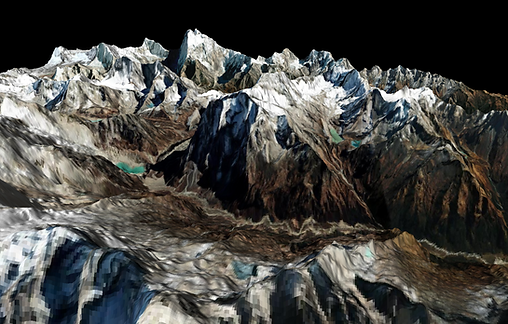
Real-Time WebGPU Snow Accumulation Simulation on Large-Scale Terrain
Overview
This project implements a real-time snow accumulation simulation based on the paper: Real-time GIS-based snow cover approximation and rendering for large terrains. The paper uses Unreal Engine as a basis for its simulation, but this project attempts to bring it to the mobile platform of the everyday browser using WebGPU as its framework for both simulation and rendering. The complete project is on Github.
Central Pipeline
We use compute shaders written in WGSL for WebGPU to simulate our snow accumulation. The overall pipeline can be broken down into 5 stages:
-
Terrain Grid Generation: from a .geotiff file with height data, generate a mesh with a uniform grid.
-
Compute: Snow Fall: Using simulated precipitation data, a snow-water equivalent (SWE) is calculated per cell
-
Compute: Snow Melt: The degree-day method is used to simulate the melting of snow independently for each terrain cell.
-
Compute: Snow Redistribution: For each terrain cell, redistribute accumulated snow to neighboring cells using inclination data.
-
Terrain & Snow Rendering: Output a color and displacement map from the compute pipeline to be rendered over the terrain.
-
Vertex Stage: Instance each mesh grid cell to the corresponding pixel of heightmap and calculated normals, uvs and positions of the terrain mesh.
-
Fragment Stage: Using the normals and uvs from vertex stage together with texture from compute pipeline to calculate the final coloring of the snow mountain.

Snow Accumulation Simulation
To ensure the efficiency of the snow accumulation simulation, a uniform grid over the terrain is used for computation, and snow values are calculated independently using a compute pipeline for each grid cell.
Terrain Grid Implementation
We create a terrain mesh using data from uploaded .tiff files, which is real-data geotiff in DEM (Digital Elevation Method) format, and use this mesh to create uniform terrain cells over the terrain for snow simulation. Physically-based parameters for each terrain cell such as inclination and aspect are then pre-processed and calculated for use further down in the pipeline for our accumulation simulation. A matching Ariel Imaginary file which has the same real-data geo info as the .tiff file is also used to render terrain.
Compute Shader: Snow Accumulation
Using physically-based variables such as inclination, aspect, temperature, and precipitation data, our compute pipeline runs the three stages of snow accumulation described above: snowfall, snow melt, and snow redistribution.
For each terrain cell, a snow-water equivalent (SWE), which represents the amount of water contained in the snowpack per unit area, is calculated, and this value represents the amount of snow output from our compute pipeline. This SWE value is modified through physically based parameters such as weather data for the snowfall stage and solar radiation for the snow melt stage. After these two stages, we then calculate the redistribution of snow between cells using terrain inclination and curvature for our final SWE output. This final step approximates physical behavior such as snow depletion on mountain tops and snow accumulation in gullies. The compute stage of our pipeline outputs a displacement and color map to be used in our snow rendering.

Perla: Arnold Renderer Plugin for Configurable Pearlescent Materials

Project Overview:
Perla is an Arnold renderer plugin for Maya designed to simulate realistic pearlescent materials based on the framework from A General Framework for Pearlescent Materials by Guillen et al. The plugin simplifies the creation of complex, smooth, lustrous, and iridescent pearlescent materials, enhancing realism and providing artists with advanced control over material properties.
Main Features:
-
Physically-based single-stratum pearlescent model with configurable properties, including substrate and coating IOR, thickness, and platelet density.
-
Custom BSDF and phase functions written in C++ to accurately simulate light scattering, interference, and absorption.
-
Integration with Maya's Hypershade UI for seamless user experience, offering real-world material presets like titanium dioxide, PET, mica, and silica.
-
Support for offline rendering using Arnold, ensuring high-quality, natural-looking results.
Implementation Details:
-
Engineered custom BSDF and phase functions to capture intricate optical interactions for pearlescent materials.
-
Developed platelet density, orientation, and thickness distributions to allow dynamic adjustments and precise control.
-
Created a user-friendly parameter interface in Maya’s Hypershade for intuitive configuration and real-time preview of material effects.
GPU Programming & Architecture
CUDA Path Tracer & Denoiser
Github for CUDA Path Tracer
Github for CUDA Denoiser
In this project, I implemented a CUDA-based path tracer and a denoiser to achieve high-quality, real-time global illumination rendering. The path tracer simulates the complex behavior of light in a scene, and the denoiser reduces noise in the final image to produce smooth results with fewer iterations. These projects demonstrate advanced GPU programming and parallel computing techniques for real-time graphics rendering.
CUDA Path Tracer Overview
The CUDA Path Tracer simulates realistic lighting using recursive ray tracing, material interactions, and advanced optimization techniques to achieve efficient rendering performance.
Features Implemented:
-
BSDF Shading Kernel:
-
Implemented diffuse and specular shading using Bidirectional Scattering Distribution Functions (BSDFs).
-
-
Path Continuation/Termination with Stream Compaction:
-
Leveraged thrust::partition to separate active rays from terminated rays, enhancing GPU efficiency by reducing unnecessary computations.
-
-
Material Sorting:
-
Used thrust::sort_by_key to group rays by material properties, minimizing warp divergence for optimized shading performance.
-
-
First Bounce Caching:
-
Cached the results of initial ray-scene intersections to eliminate redundant calculations, improving performance for predictable scenes.
-
-
Refraction:
-
Implemented physically-based refraction to simulate transparent materials like glass and water.
-
-
Anti-Aliasing:
-
Applied anti-aliasing techniques to produce smoother edges and reduce jagged artifacts.
-
-
Depth of Field:
-
Implemented realistic depth of field effects using configurable lens radius and focal distance.
-
-
GLTF Loading:
-
Integrated mesh loading using the tinygltf library, supporting 3D model rendering.
-
-
Hierarchical Spatial Data Structures (BVH):
-
Implemented a Bounding Volume Hierarchy (BVH) for efficient ray-geometry intersection tests.
-
CUDA Denoiser Overview
The CUDA Denoiser improves the visual quality of path-traced images by reducing noise using the A-Trous wavelet transform guided by geometry buffers (G-buffers). The implementation is based on this paper: https://jo.dreggn.org/home/2010_atrous.pdf
Features Implemented:
-
A-Trous Wavelet Filter:
-
Implemented the A-Trous wavelet filter based on the paper "Edge-Avoiding A-Trous Wavelet Transform for Fast Global Illumination Filtering."
-
-
G-Buffer Integration:
-
Utilized G-buffers containing per-pixel normals and positions to guide the denoising process and preserve scene details.
-
-
Edge-Aware Filtering:
-
Applied edge-aware filtering to retain sharp edges while smoothing noise in flat areas.
-
-
Performance Analysis:
-
Conducted performance analysis to evaluate the impact of denoising on rendering times and the number of samples required for smooth images.
-
-
Qualitative Analysis:
-
Compared visual results across different filter sizes and scene types to assess the effectiveness of the denoiser.
-


Vulkan Grass Simulation & Rendering
Github
In this project, I implemented a grass simulator and renderer using Vulkan, leveraging compute shaders for physics calculations and optimizing rendering efficiency through advanced culling techniques. The grass blades are represented as Bezier curves, with forces like gravity, wind, and recovery simulated in real-time. This project is an implementation of the paper, Responsive Real-Time Grass Rendering for General 3D Scenes.
Project Objectives:
-
Physics with Compute Shader: Real-time physics for grass blades using Bezier curves.
-
Dynamic Tessellation: Procedural grass geometry generated with tessellation shaders for detailed rendering.
-
Advanced Culling: Optimized performance with orientation, view-frustum, and distance culling.
-
Shader Pipeline: Implemented vertex, tessellation, and fragment shaders for realistic transformation and shading.
-
Environmental Forces: Simulated natural forces like gravity, wind, and recovery for lifelike motion.
-
Level of Detail: Adaptive tessellation based on distance for performance optimization.
CUDA Flocking
Github
In this project, I implemented a flocking simulation using CUDA, based on the Reynolds Boids algorithm. The goal was to gain practical experience in writing CUDA kernels, optimizing GPU performance, and analyzing results. The project was divided into multiple parts, each building on the previous to improve simulation performance.
Project Objectives:
-
Naive Flocking Simulation:
I implemented a basic flocking simulation where each boid (particle representing a bird or fish) interacts with every other boid based on the three fundamental rules of the Reynolds Boids algorithm:-
Cohesion: Boids move toward the perceived center of mass of nearby boids.
-
Separation: Boids avoid getting too close to other boids.
-
Alignment: Boids match the velocity of nearby boids.
In this naive approach, each boid checks every other boid for interactions, leading to an O(N²) computational complexity.
-
-
Optimization with Uniform Grid:
To improve performance, I introduced a uniform spatial grid to optimize the neighbor search process. By binning boids into grid cells based on their positions, I significantly reduced the number of neighbor checks. This optimization allowed each boid to only interact with boids in neighboring cells, reducing computation time and improving simulation performance. -
Further Optimization with Coherent Memory Access:
I further optimized the simulation by rearranging boid data in memory, making velocity and position data contiguous for boids within the same grid cell. This approach minimized memory scattering and improved data access efficiency, leading to faster simulation performance.
GPU Stream Compaction in CUDA
Github
This project focuses on implementing GPU stream compaction in CUDA, optimizing performance through parallelism for efficient data processing. The work involved understanding and applying key concepts of GPU-based algorithms, useful for graphics-intensive tasks like path tracing.
Project Highlights:
-
CPU Scan & Stream Compaction: Built foundational CPU-based prefix sum and compaction to understand algorithm logic and prepare for GPU implementations.
-
Naive GPU Scan Algorithm: Developed a naive GPU scan using a two-buffer approach to avoid race conditions, managing global memory access for safe parallel execution.
-
Work-Efficient GPU Scan: Implemented a parallel binary tree-based scan for higher efficiency, handling complex cases with non-power-of-two arrays.
-
Stream Compaction with Efficient Scan: Applied scatter operations to remove zeros from arrays using work-efficient scan logic, improving data processing performance.
-
Thrust Library Integration: Leveraged Thrust's exclusive_scan for GPU scan, optimizing memory operations by reducing overhead.
-
Efficiency Analysis: Diagnosed performance bottlenecks, exploring load balancing optimizations like early thread termination to maximize throughput.
-
Radix Sort Using GPU Scan: Implemented parallel radix sort using the scan algorithm, achieving high performance for sorting tasks.
-
GPU Scan with Shared Memory: Used shared memory to reduce access latency and eliminate bank conflicts, achieving optimal GPU performance.
Procedural Computer Graphics

Overview:
IsleScape is an ambitious procedural graphics project that creates a stunning, dynamic island environment by combining procedural generation techniques in Houdini with the advanced rendering capabilities of Unity. Inspired by games like No Man's Sky and Minecraft, this project blends art and technology to craft a visually arresting and ever-changing virtual landscape, featuring realistic clouds, water, terrain, and wildlife.
Project Highlights:
-
Procedural Cloud Simulation (Houdini):
-
Created dynamic, lifelike cloud simulations using metaballs, noise algorithms, and cloud nodes. Animated behaviors such as collisions and merging enhance the realism and movement of clouds around the island.
-
-
Procedural Terrain Generation (Houdini):
-
Sculpted realistic island terrains with noise algorithms and terrain elevation techniques. Detailed features like grass and vines create visually unique islands with authentic, natural environments.
-
-
Dynamic Map Generation (Houdini):
-
Generated diverse map layouts using a wave function collapse algorithm, creating procedurally unique island shapes and sizes for each landscape.
-
-
Advanced Fog System (Unity):
-
Developed a sophisticated fog effect that dynamically adjusts based on the camera’s position, adding atmospheric depth and realism to the scene.
-
-
Realistic Water Simulation (Unity):
-
Achieved convincing water effects using blended normal textures, Blinn-Phong lighting, and a custom reflection camera with Kawase Blur for softened, realistic reflections.
-
-
Butterfly Flocking Effect (Unity):
-
Customized a Unity Asset to create an organic butterfly flocking effect, enhancing the scene’s dynamic, lifelike quality with graceful, synchronized movements.
-
Shader Graph 3D Stylization in Unity
Github
Stylight is a 3D stylization project inspired by 2D concept art, bringing the art to life through non-physically-based rendering techniques in Unity. The project features custom shaders, stylized effects, and interactive elements to create an engaging, dynamic scene with a unique visual style.
Project Highlights:
Implemented a custom three-tone toon shader inspired by concept art, supporting multiple light sources and stylized shading through shader graph techniques. Developed an animated fireball shader featuring dynamic color transitions using procedural patterns and time-based animations. Created a post-process outline effect leveraging depth and normal buffers, offering adjustable parameters for line width, animation, and stylized visual consistency. Added a full-screen fog effect utilizing camera position-based calculations, enhancing atmospheric depth with custom shader graphs. Designed procedural shadows based on object UV coordinates for consistent, seamless shadowing. Matched the scene's colors and lighting with the original concept art using precise color palette replication. Introduced real-time interactivity with a custom C# script to dynamically change a point light’s color on key press, demonstrating the scene's dynamic rendering capabilities.
Procedural Modeling: Jellyfish & LEGO World
This project showcases procedural modeling techniques in Houdini, featuring a dynamic jellyfish simulation and the transformation of 3D meshes into LEGO-inspired structures. The project highlights both organic modeling and modular design approaches.
Procedural Jellyfish (Houdini):
Engineered a dynamic jellyfish simulation leveraging procedural noise algorithms and advanced simulation techniques to generate complex structures including a detailed bell, arms, veins, organs, and tentacles. Achieved photorealistic results using custom shading and lighting models for enhanced visual impact.

LEGO-ifying Meshes (Houdini):
Transformed mesh geometry into volumetric points for adaptive LEGO brick placement, leveraging procedural VDB conversions. Implemented classification algorithms to categorize points into block, slope, and flat bricks while enforcing non-overlapping placement through bounding box checks. Integrated user-adjustable parameters for brick size and distribution. Simulated rigid body dynamics to model realistic brick detachment and collision behavior upon impact.


WebGL Fireball Animation
Github
Overview:
This project showcases a procedurally generated fireball effect using WebGL. Leveraging vertex and fragment shaders, the project combines dynamic noise algorithms, such as fractal Brownian motion (fbm), with domain warping techniques to achieve intricate and animated visual effects on a 3D surface. The shaders are designed to simulate a roiling fireball with animated textures and customizable parameters for interactive control. View my Live Demo here: Live Demo
Project Highlights:
-
Vertex Shader: Applied high-amplitude, low-frequency displacement and fine-grained fbm noise to deform the 3D icosahedron, creating a dynamic fireball structure.
-
Fragment Shader: Generated layered Perlin noise patterns and animated color gradients, simulating the appearance of swirling flames.
-
Animation: Integrated real-time animation using time-based uniform variables, creating a continuous roiling effect.
-
Interactivity: Implemented adjustable controls using dat.GUI, allowing users to modify noise scale, frequency, fbm amplitude, and restore defaults for optimized visuals.
-
Toolbox Functions: Utilized over four mathematical toolbox functions across shaders to enhance visual complexity.
-
Background Integration: Added a visually cohesive animated background to enhance the overall scene aesthetics.

Game Design & Development
Star Catcher (Unity VR Game)
Developed in Unity with Steam VR plugins
User's Guide for Star Catcher
Introduction
Welcome to Star Catcher, a single-player VR game where you play as a child trying to catch falling stars during a magical meteor shower! This guide will help you navigate through the game and explain the main features you will encounter.
System Requirements
To play Star Catcher, you will need a PC with SteamVR and a compatible VR headset, such as the HTC Vive. Please refer to the game's system requirements for more detailed information.
Getting Started
Once you have installed and launched the game, you will find yourself in the main menu. Here, you can start a new game. When you're ready to begin, select "Start Game" which will take you to a quick tutorial screen. Once you are finished reading the tutorial, select “Play” by pressing the trigger key on your controller and immerse yourself in the enchanting world of Star Catcher.
Game Features
Visual and Sound Effects
The game features various sound effects and music to enhance your experience, such as button interaction sounds, collection noises for items, and music for the win and lose screen. The game also features particle effects to showcase star trails and collisions for stars and meteors.
Falling Stars
The main objective of Star Catcher is to fill your star jar with starlight by catching as many falling stars as possible before time runs out. The color of the star will be an indication of its rarity and point value, with pink stars being the most common and yellow stars being the most rare. The more rare the star, the higher the point value as well as the speed of its fall, which will make them harder to catch. Be quick, as stars have limited lifespans and will burn out if not caught in time.
Obstacles and Space Debris
While catching stars, you will need to protect the star jar in the middle of the forest from harmful space debris. This can be done by catching meteors before they collide with the jar. If the jar collides with a meteor, it will result in lost points.
Power-ups
Catch fireflies as they fly by to gain additional power-ups. Picking up a firefly will pause the meteor shower for 10 seconds, giving you a brief respite to catch your breath and focus on your strategy. A UI screen will appear to showcase the timer to the user.
Scoring System and Star Jar
Your score is determined by the number of stars you catch and the type of stars collected. Collected stars will fill the 3D star jar in the middle of the forest. Your progress is displayed on the in-game UI on your left hand (represented by a timer and a current score) as well as on the jar itself (represented as the number of star points currently collected and the threshold for the level). Make sure to keep an eye on the star jar, as you need to catch enough stars to fill it up and protect it from debris to avoid losing points.
Level Progression
To win the game, you must reach the minimum point requirement for each level. The difficulty will increase as you progress through the levels, requiring more points and introducing more obstacles.
Controls and Navigation
-
Use your VR headset to look around and locate falling stars, power-ups, and obstacles. Physically move within your play area to dodge obstacles or get closer to stars and power-ups. Use the VR controllers to interact with the game world:
-
Point and hold the trigger on hand controllers to catch falling stars when in the "catching" zone or to interact with buttons on UI screens.
-
Lift the left controller to check the UI, which displays your current score and time remaining.
-
Tips and Strategies
-
Prioritize catching higher-value stars to maximize your score, but don't forget that lower-value stars are easier to catch.
-
Keep an eye out for power-ups, as they can significantly boost your performance.
-
Always be aware of your surroundings and be prepared to shield your jar from obstacles as they appear.
-
Manage your time wisely; try to catch as many stars as possible without compromising the safety of your star jar.
We hope you enjoy playing Star Catcher! Good luck, and may the stars be ever in your favor!
Sneaky Stacks
Developed in UE4/5 Using Blueprint and C++
User's Guide and Game Features for Sneaky Stacks
Introduction:
Welcome to the User's Guide for Sneaky Stacks! This guide is designed to help you understand the gameplay mechanics and features implemented in our game. Sneaky Stacks is a single-player, third-person stealth game with strong platformer overtones, set in a busy movie theater environment.
Gameplay Features:
-
Play as a whimsical stack of children disguised in a trench coat, attempting to sneak into a movie theater while gathering additional children to expand your stack along the way.
-
Journey through the bustling and vibrant movie theater environment, skillfully evading obstacles such as strategically placed garbage cans and unsuspecting adult NPCs.
-
Outwit the vigilant theater worker NPCs, who are equipped with advanced UE5 Enemy AI systems that patrol the theater, all the while keeping your suspicion level to a minimum.
-
Enhance your stack by strategically collecting children scattered throughout the theater, creating an increasingly precarious and challenging experience.
-
Earn points for each child added to the stack, and master the art of maintaining balance and speed with our innovative player physics feature that introduces a realistic wobbly effect to the stack's movements.
-
Preserve a low suspicion level by carefully avoiding collisions with objects and NPCs, and utilize popcorn power-ups to reduce any suspicion that may have been aroused.
-
Seize soda can power-ups to gain temporary stability for your stack, effectively eliminating any wobbling, allowing for a smoother navigation experience.
-
Achieve victory by successfully reaching the desired number of children in your stack, all without being detected by theater workers or running out of precious time.
Experience the thrill, challenge, and unique gameplay mechanics of Sneaky Stacks, as you put your dexterity and stealth skills to the test in a captivating and entertaining game world.
User's Guide
-
Controls:
-
Use [WASD] keys or the left joystick (on a game controller) to move the stack of children.
-
Click on the screen to start the game.
-
Interact with children and power-ups by simply colliding with them. No additional button input is required for interaction.
-
-
Suspicion Bar Management:
-
Avoid bumping into obstacles and adults to prevent raising suspicion.
-
Collect popcorn power-ups to lower the suspicion bar.
-
-
Power-ups:
-
Soda Can: Temporarily stabilizes the stack, preventing wobbling for a short period.
-
Popcorn: Lowers the player's suspicion bar.
-
-
Winning the Game:
-
Successfully collect the desired number of children without exceeding the suspicion bar limit or running out of time.
-
We hope you enjoy playing Sneaky Stacks and make the most of this unique and entertaining experience!
Advanced Rendering
Physically Based Rendering (PBR)
Overview
Physically-Based Rendering (PBR) System: Implemented a point-light-based PBR shader for simulating realistic light-material interactions. Utilized Cook-Torrance and Lambertian BRDF models for glossy and diffuse reflections respectively. Also ensured energy conservation in the system by constraining the sum of the BRDF components to be less than or equal to one.
Advanced Lighting Techniques: Built shaders to handle ambient light and point light intensity falloff, ensuring more realistic lighting in the scenes. This system also handled gamma correction, color space remapping for working in HDR, and included a visibility test in the Light Transport Equation to account for obstructed light paths.
Enhanced Material Rendering and Effects: Developed a system to support normal mapping and displacement mapping for more detailed and realistic surface rendering. Implemented precomputation methods for diffuse and glossy irradiance, and incorporated Fresnel term using the Schlick approximation. Also added an approximation for subsurface scattering, giving plastic materials a more realistic glow effect
In conclusion, through careful implementation of these techniques and principles, I succeeded in creating a sophisticated physically based rendering system that can generate highly realistic 3D scenes.


Monte Carlo Path Tracer
Overview
Monte Carlo Path Tracing Implementation:
Developed a robust path tracing system employing Monte Carlo integration techniques, to simulate complex light behavior in 3D scenes. This method allows for the creation of highly realistic images by probabilistically simulating light paths and their interactions with different objects and surfaces. My implementation supports the rendering of complex lighting effects such as hard and soft shadows, depth of field, motion blur, caustics, and diffuse and specular inter-reflections.
Advanced Illumination Techniques:
I incorporated advanced techniques for estimating direct illumination. The system supports multiple importance sampling, which strikes a balance between different sampling strategies to minimize variance and improve image quality. It allows the path tracer to generate accurate, noise-free images faster, as it more effectively captures light behavior such as specular reflections and transmissions. I also implemented various Bidirectional Scattering Distribution Functions (BSDFs) for handling different material types, enabling the representation of a wide range of real-world materials.
Support for Different Light Sources and Materials:
The path tracer caters to a variety of light sources such as point lights, spotlights, and area lights, each with their unique sampling methods. It also accommodates diverse material types including specular (reflective and transmissive) and diffusive materials, as well as more complex materials like microfacets.
Optimization and Fine-Tuning:
In order to improve the efficiency of the system, I implemented a mechanism to prevent double sampling of direct light at each intersection point. This ensured that only the direct illumination computed by multiple importance sampling contributes to the light's final color, barring the scenarios where the ray comes directly from the camera or a specular surface. I also optimized the global illumination computation by maintaining a throughput variable, accounting for the compounding attenuation of light as it bounced through the scene.


Interactive Computer Graphics
Projects
MINI MINECRAFT
-
Developed procedural generation of terrains and caves using 3D noise functions based on real-time player location
-
Implemented optimization of procedural terrain loading through chunking techniques by interleaving VBO data
-
Generate branching rivers that carve themselves out of the surface terrain procedurally using 2D L-systems
-
Created OpenGL framebuffer for water and lava effect with post-processing shaders, added GLSL procedural skybox
Programming Language: C++, OpenGL
.

MINI MAYA
-
Half-edge algorithms: Implemented mesh data structures that include split edge, triangulation, extrude, and Catmull-Clark subdivision
-
Loaders: Implemented OBJ file loader and JSON file loader
-
Skeletons and Skinning: Implemented distance-based automatic skinning, interactive skeleton, shader-based skin deformation based on bind matrices, joint transformations, vertex's influencer IDs, and vertex's weights
-
Implemented Graphical user interface for mesh display and deform, and OpenGL mesh visualization
Programming Language: C++, OpenGL

OPENGL SHADERS
-
Surface Shader Programs: Implemented Blinn-Phong Reflection Shader, Matcap Reflection Shader, Iridescent Shader, Vertex Deformation Shader
-
Post-Process Shader Programs: Implemented Greyscale and Vignette Shader, Gaussian Blur Shader, Sobel Filter Shader, Fake Bloom Shader, Noise-Based Post-Process Shader
Programming Language: C++, OpenGL

RASTERIZER
-
2D Triangle Rasterizer: Implemented line segments, bounding boxes, triangle rendering, barycentric interpolation, and Z-buffering
-
3D Triangle Rasterizer: Implemented perspective camera class, interactive camera, perspective-correct interpolation, texture mapping, and Lambertian reflection
Programming Language: C++, OpenGL

Computer Animation
Animation Toolkit - Curve Editor
(C++)
-
Spline Curve: Implemented linear spline, cubic Catmull-Rom Splines, and equivalent Bezier curves (Bernstein, De Casteljau, and Matrix), Hermite Spline, and Cubic B-Spline
-
Rotation: Implemented linear and cubic Euler angle interpolations, orientation representations (between Euler Angle and rotation matrix, between rotation matrix and quaternion, and between quaternion and Axis/Angle representations), and linear and cubic quaternion interpolations
Programming Language: C++

Animation Toolkit - FKIK (C++)
-
Implemented the ATransform class that includes features to support a character skeleton whose joints are arranged in a hierarchy where each child is positioned and oriented relative to its parent as the basis of FK (Forward Kinematics) and IK (Inverse Kinematics)
-
FK (Forward Kinematics): Implemented FK which is the process of computing the position and orientation of each joint in a skeleton relative to the world given the local joint transformations.
-
IK (Inverse Kinematics): Implemented IK which is the process of determining the joint angles and link lengths of a robot or mechanism that would achieve a desired position and orientation of an object or system.
Programming Language: C++

Animation Toolkit - Particle System
(C++)
-
Basic C++ Particle System Simulation: Implemented a basic particle system class whose job is to emit particles. Each particle has a set of properties including position, orientation, and color number, and all properties change over time
-
C++ Based Fireworks Simulation: Implemented a fireworks simulation based on the C++ particle system where when the user presses the space key, a rocket will fire into the air with a randomized velocity and time to live. When the rocket's time to live expires, the rocket explodes into concentric rings of sparks. When the sparks reach the ground, the sparks bounce.
-
Houdini- based Fireworks Simulation: Created a firework simulation using the Houdini FX software
Programming Language: C++

Animation Toolkit - Behavioral Animation (C++)
-
Implemented GUI of relevant behavior parameters, the agent body dynamics, and control laws as the basis for behavioral animation
-
Behaviors: Implement 6 types of individual behaviors
and 5 types of group behaviors. The 6 types of individual behaviors include Seek, Flee, Arrival, Departure, Wander, and Obstacle Avoidance. The 5 types of group behaviors include Separation, Cohesion, Alignment, Flocking and Leader Following
Programming Language: C++

Computer Vision
Machine Perception Project: Two-View Stereo Algorithm Implementation (Python)
Overview
This project required the creation of a two-view stereo algorithm capable of transforming multiple 2D viewpoints into a comprehensive 3D reconstruction of a scene. It involved extensive work with Python and various associated libraries. One of the key features of this project was the use of the K3D library, which facilitated the visualization of the 3D point clouds generated by the stereo algorithm. The assignment was broken down into several key tasks:
-
Rectify Two View: The first step involved rectifying the two viewpoints. This involved understanding the camera configuration, computing the right-to-left transformation, and rectification rotation matrix. The rectification process was derived from the provided lecture slides but required careful consideration due to the clockwise rotation of the images in our dataset.
-
Compute Disparity Map: Next, I implemented a method to compute the disparity map, which involved comparing patches using three different metrics: SSD (Sum of Squared Differences), SAD (Sum of Absolute Differences), and ZNCC (Zero-Mean Normalized Cross-Correlation). This required me to write kernel functions for each metric and apply them to the image patches.
-
Compute Depth Map and Point Cloud: After obtaining the disparity map, I developed a function to compute the depth map and point cloud. This allowed each pixel to store the XYZ coordinates of the point cloud, creating a more accurate 3D reconstruction.
-
Postprocessing: I implemented some post-processing steps to remove background noise, crop the depth map, remove outliers from the point cloud, and transform the point cloud from the camera frame to the world frame.
-
Visualization: Using the K3D library, I visualized the reconstructed point cloud directly within the Jupyter notebook. The result was a detailed, interactive 3D reconstruction of the scene, generated from the initial 2D viewpoints.
-
Multi-pair Aggregation: Finally, I used multiple view pairs for the two-view stereo and aggregated the reconstructed point cloud in the world frame.
The culmination of this project was a fully reconstructed 3D point cloud of a temple, which was captured in various screenshots and can be viewed interactively. Overall, this project was a great opportunity to dive deep into machine perception and demonstrate my ability to manipulate and interpret complex datasets.

Machine Perception Project: Fitting 2D Images and 3D Scenes Using Multilayer Perceptron Networks (Python)
Overview
This project is based on the principles of machine perception. The project was primarily centered around fitting a 2D image and a 3D scene using Multilayer Perceptron (MLP) networks.
In the first part of the project, I focused on fitting a 2D image. This entailed:
-
Implementing Positional Encoding to map continuous input coordinates into a higher dimensional space. This allowed the neural network to approximate high-frequency variations in color and texture more effectively.
-
Designing an MLP with three linear layers, using ReLu activation for the first two layers and a Sigmoid activation function for the last layer.
-
Training the MLP to fit the given image, using the Adam optimizer and Mean Square Error as the loss function. The pixel coordinates were normalized and the output was transformed back to an image. The performance of the MLP was assessed by computing the Peak Signal-to-Noise Ratio (PSNR) between the original and reconstructed image.
In the second part of the project, I tackled fitting a 3D scene. The steps I undertook for this task were:
-
Computing the images' rays based on the transformation between the camera and the world coordinates along with the intrinsic parameters of the camera.
-
Sampling points along a ray, with points chosen evenly along the ray from the near to the far end.
-
Designing a Neural Radiance Fields (NeRF) MLP that took as input the position and direction of the sample points along the ray, after applying positional encoding to both.
-
Implementing a volumetric rendering formula to compute the color of each pixel. This involved numerically approximating a continuous integral for the ray color, based on the density and color of an adequate number of samples along a ray.
-
Rendering an image by calculating all the rays, sampling a number of points from these rays, passing them through the neural network, and then applying the volumetric equation to produce the reconstructed image.
-
Integrating all the aforementioned steps to train the NeRF model using the Adam optimizer and Mean Square Error as the loss function.
Throughout the project, I experimented with positional encoding of different frequencies, which provided valuable insights into its effects on the image-fitting process. This project allowed me to delve deep into the applications of machine learning in computer vision and gave me a solid understanding of advanced concepts like NeRF and volumetric rendering. The final model achieved a PSNR over 24 after 3000 iterations, demonstrating effective learning and a decent approximation of the 3D scene from 2D views.


Facial Recognition & Artistic Style Analysis
Python
In this project, we utilized face-detection software and a deep neural network to generate 3D reconstructions from collected facial data. We then analyzed the reconstructed faces to assess stylistic similarities across different artistic periods, exploring how facial features align with various artistic styles.
-
We implemented our program in Google Colab notebook with Python
-
The face Recognition & 3d reconstruction software we used is from https://github.com/cleardusk/3DDFA_V2.git
Analysis on Natural Face Comparison
To train the dataset, we deliberately chose a diverse natural faces dataset consisting of 188 faces, featuring 21-year-old characters across White, Asian, and Black backgrounds. This selection allows us to analyze stylistic realism and photogenic qualities within different artistic datasets:
-
The closer the correlation of similarity between an artist’s dataset and the natural faces dataset, the more likely it is that the artist’s style leans toward realistic representation with photogenic appeal.
-
A higher degree of clustering within a specific group indicates a tendency toward a racially homogenized representation in the artist’s character designs.

Experiment Implications
-
Botero's unique artistic style distinctly sets him apart from most other historical art styles, which aligns with the primitivism influence seen in his character designs.
-
Compared to Botero and Kahlo, the majority of artists from this dataset represent a period where art predominantly focused on white characters. This tendency toward racial homogenization results in denser clustering within the dataset.
-
Artists with a less realistic style of portraiture or a more diverse representation of race break away from these historical norms, creating more visually distinct clusters.
-
An interesting observation is that most paintings analyzed did not overlap significantly with the natural faces cluster, suggesting that these paintings could provide insights into the stylistic uniqueness of the selected artists.


